Sunday, 16 February 2014

DIY: Painted Jars

If you have spent any time on pinterest ever you will definitely have noticed the massive trend of mason jars for every imaginable purpose. I love the look of jars (my cousin had them everywhere at her wedding and it was oh so romantic) however the price tag of mason jars here in Australia is not so loveable. 

While cleaning out my wardrobe I found a stack of empty candle jars (because apparently I'm a huge hoarder) and decided to put one of them to use for my very own jar project. May I present my very new bedside bouquet in an old yankee candle jar

Instagram makes everything pretty

If you would like to create your own I have included instructions below.


Firstly you will need to gather your supplies.

  • Old jar (I used a yankee candle jar because I like the unique shape they have, but I'm sure anything from a pasta sauce jar to an actual mason jar would work)
  • Acrylic Paint (I used 'Antique White' by Semco)
  • Glitter (super fine is best)
  • Glue (I used Martha Stewarts Glittering Glue)
  • Sponge brushes
  • Faux Flowers (Mine are peonies from the ever fabulous Ikea)


If you used a candle jar you will need to get the excess wax out before you start. I took photos of all the steps but to make this post less picture intensive you can find instructions HERE.


Once your wax is removed you can get onto painting the jars. I know some people paint the outside of their jars but I love the glossy look of the paint inside the jars, and I kid you not it is the simplest thing ever!

Sorry about the busy newspaper underneath
Pour/squirt some paint into the bottom of the jar


Begin to twirl it so it covers the entire bottom of the jar, then begin to swirl it around the sides. You may have to add more paint into the jar as you go (for this reason paint in a tube is easier to use). If needed squirt new paint onto the inner sides of the jar.


Continue swirling, adding paint, and swirling again until all of the jar is covered with paint. Leave it to dry on newspaper. Initially upside down, however after a few hours/when the paint is almost set turn the jar right side up to allow the jar to completely dry.


Using a sponge brush add a thin layer of glue around the top rim of the jar.


Sprinkle glitter onto the glue and leave to dry.


All dry and ready for flowers

Once the jar is dry you can begin to arrange your flowers in it. Side note: I found my flowers were scratching the paint off the jar because they had rough wire stems once I cut them down. To combat this I filled the jar with cotton balls (cotton stuffing would work too) and cut the flowers very short.


Place arrangement where you will see it and admire your work daily.


Well there you have it, how to create your very own arrangement of cuteness.

If you create your own I'd love to know so let me know in the comments below.

x Stacey

Friday, 31 January 2014

Handbag Essentials

I've never been the type of girl who carries my entire life around in my bag...or so I thought until my boyfriend recently commented on how much stuff I have in my bag. 'But I need these things, they are essentials' was my reply to which I was met with raised eyebrows. Who knows maybe men really are from Mars and women from Venus. 

Anyways, aside from feeling the need to justify myself to the internet I've always loved stickybeaking in other peoples bags on youtube and blogs. So here is my contribution of what is constantly in my bag, to some it may seem like a lot and to other it may seem very spartan. The bag featured is sadly one I do not own but have been lusting after for a while, you can purchase it here.

Clockwise from top left. 
MAC Studio Fix Powder Plus Foundation: This in combination with Fix + creates an amazing foundation that's easy to apply. I keep the compact in my bag for touchups as well as to use the mirror if needed. 

Neutrogena Naturals Lipbalm: I love love love this lip balm, it's super soothing and the peppermint smell reminds me of Christmas all year round.

L'Occitane Shea Hand Cream: This is my absolute favourite hand cream ever! I have praised it before on this blog and adore the full size one for at home. To make sure I'm never without I always have a mini in my bag for dry skin emergencies.

Chanel Coco Shine in Boy: While I always put whatever lipstick I am wearing on a particular day into my bag, I like to keep a tube of Chanels Coco Shine in Boy in there as well. This sheer nude pink colour is great for touchups or to use incase I forget to put lipstick on that day. 

Phone: Like many people from my generation I would feel lost and naked without my phone, it has my life on it!! Phone cases are a fun way to add a cute touch of your personality to any outfit and I am definitely loving this Belle case from Queen of Cases on etsy. It comes for a variety of phones, and if Belle isn't your cup of tea there are many other princesses to choose from. 

Kikki-K Diary: I'm such an old fashioned pen and paper kinda girl, there is something so lovely and tactile about writing down all my events, appointments and to-do's in my diary (it's also super handy if my phone dies). I received this Kikki-K diary for Christmas and absolutely love how adorable and cute it is. If you want one you best snap it up quickly as they are sold out online, so check your nearest store (they have other cute diaries online if you can't make it to a store).

Kikki-K Pen: To write in my diary with (duh). But also for filling out forms, taking down numbers, lending to strangers etc. 

Keyring: Yes I'm one of those people with a Tiffany keyring, my grandparents gave me one for my 18th birthday (it's not the one pictured as they don't make it anymore but it's super close). Keys are a pretty essential part of life, you use them everyday and a pretty keyring makes them easy to find and also can brighten your day.

Tissues: Because sometimes I sneeze/cry.

Bobby pins: I'm currently growing out my fringe (I think, I may change my mind) so these are super helpful for taming my too long but not long enough hair.

Hair Lackies: Most of the time I wear my hair down, but throughout the day I may encounter situations where I wish/need to pull it into a pony tail. While I can't vouch for their effectiveness (haven't tried them) these lackies are super cute!

Wallet: I bought myself a Coach wallet a few years back when I was in America and it has held up really well. They don't make the one I have anymore, but this one is similar in design and super pretty. 

So there you have it, my handbag essentials. In addition to this I may add items specific to what I'll be doing each day, cardigan for the movies, book if I'm going on a train etc. But this is the stock standard basics that I always have with me regardless. Does this seem like too much or too little for you? Let me know what you keep in your bag in the comments.

x Stacey

Wednesday, 29 January 2014

One Dress, Four Disney Inspired Outfits

If you're as massive a Disney fan as I am then you've most likely heard about Disneybounding by now. For those not in the know Disneybounding is where everyday people such as you and I take fashion inspiration from the vast catalogue of Disney characters. While many people Disneybound every day, I feel the best place to Disneybound is at a Disney park (duh). Unfortunately if one is flying to a Disney park weight limits on baggage do constrict the variety of outfit choices one can take. However, while browsing boohoo.com I found what I believe to be the most perfect Disneybounding dress ever! 


Ashley Wrap Over Dress

The Ashely Wrap Over Dress from boohoo.com is a beautiful blue skater style dress in a jersey fabric (great for travelling) and is only $16 (AUD)....yes $16!! For that price (and a 20% off sale, plus free shipping) this little baby went right into my cart. While I haven't tried it on yet (it's still in transit) it appears to have favourable reviews on the site. If you would like this dress though be quick as it is currently out of stock in sizes 10, 14, and 16. Although I do believe it is a staple dress and they will most likely re-stock.

While I await this dresses arrival I have put together four disneybound ideas for the imaginary holiday I'm planning in my head to Disneyland (hey I could win lotto any day). Click the text under the pictures for a link to polyvore to see where you can buy the items. 


Alice
Alice
When I saw this dress the first character to come to mind was Alice in her pretty blue dress. For Alice's styling I would place the white camisole under the dress, in addition to the white bow belt this serves as a subtle nod to her white apron. Instead of white stockings, small white frilly socks with black mary janes provide a more contemporary look. I used a black bag to balance out the black shoes however feel free to replace with a white bag if desired. A subtle little homage to your character of choice is provided by the locket, and of course you wouldn't be Alice without a black bow headband!


Wendy

Wendy

Wendy was one of my favourite Disney ladies growing up, I always wished for Peter Pan to come and pay me a visit. Wendy's look is very much blue and as much of it as her beautiful nightgown will allow. To play off this I have paired the dress with a metallic blue belt to serve as her sash, however feel free to replace with a real ribbon sash if you so desire! I found a beautiful Wendy ribbon to pull your hair off your face with from Little Bow Chic Designs on etsy, curls optional. For accessories I kept them neutral toned as Wendy is in her night gown, so she wouldn't have many accessories on her (and finding coordinating blue shoes is a nightmare). Finally, while this was not in the movie, I have added an acorn necklace like the one Peter gave Wendy in the book.


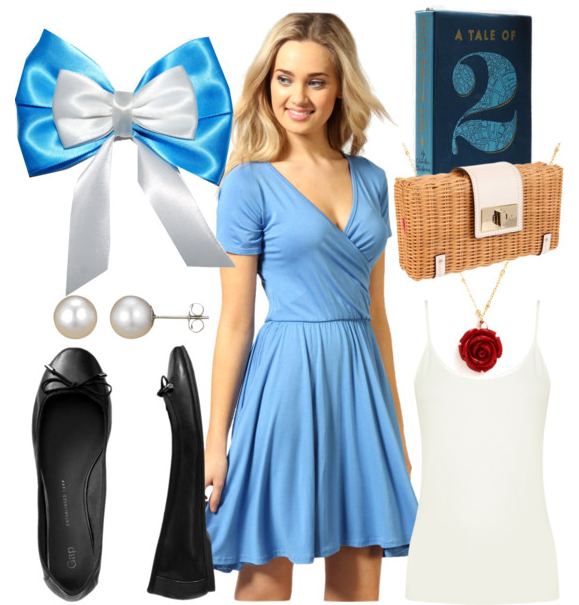
Belle

Belle

Without a doubt Belle is my favourite Disney Princess! I love everything she stands for, her beauty, her outfits, and of course all the wonderful songs in the movie. While she is most well known for her iconic yellow gown I love her 'little town' look in the blue dress. 

As with Alice I have used a white camisole under the dress to act as a stand in apron. A rose necklace serves as a nod to the enchanted rose in the movie. Black flats are sensible for running around town completing errands. For bags I absolutely love the Kate Spade book clutches, don't they fit Belle's personality perfectly. If that is a bit too expensive a simple wicker clutch can serve as your modern day basket (the one pictured is expensive but I have found wicker clutches in Summer for quite cheap). Finally the key to little town Belle is her hair. Secure your hair in a topsy turvy pony tail (as shown in this video: http://www.youtube.com/watch?v=mfRcR2d7xic) and add the 'little town Belle' bow found on etsy to complete the look. 


Cinderella

When you think of Cinderella you think of blue and a whole lot of silver. To compliment the dress I have selected a silver rope and pearl headband from ASOS, huge blingy faux diamond studs, and a beautiful black and crystal chocker-style necklace to replace her black necklace. To carry around your every-day necessities I have included a silver cross-body bag. While all of this is very in keeping with Cinderella the part of the outfit that screams Cinderella is the glass slippers, or in this case silver glitter jelly sandals (much more practical than walking on glass all night). Because your tootsies will be on display in these sandals you may as well paint them to match with this beautiful silver glittery nail polish from Essie, while you're at it do your fingernails too!


So there you have it, one very cheap dress, four amazing disneybound ideas. I hope you have pulled some inspiration from this and have fun planning your next disneybound, whether it be to Disneyland or just to the supermarket. 

xo
Stacey


Friday, 23 August 2013

Accurate

I'm not sure how many of you are New Girl fans but I love it! The following is one of my favourite moments from the show and is basically me every time I'm in the car


I don't think anything else needs to be said.

x Stacey

Tuesday, 20 August 2013

Teacher Tuesday

Oh my gosh it's a miracle, I'm actually posting a Teacher Tuesday on a Tuesday!

Unfortunately no freebies today, however I do have some good news (well for me at least). Today I received my final prac placement allocation which is cause for celebration for two reasons:

1. The uni was able to find me a placement so I don't have to go hunting for one like last time

2. My placement is in a kindergarten which I was hoping for since it gives me a chance to experience using the EYLF.


So please excuse me while I leave you to go scrub up on my EYLF reading. To make up for the lack of freebie today I leave you with an outfit set that you could wear for teaching during the coming Spring (for those in the southern hemisphere) or for Autumn/Fall (for my readers in the northern hemisphere).

yay for mustard


x Stacey


Sunday, 18 August 2013

The Little Ostrich That Could


Ok Call me crazy, but I have just spent the last hour of my life watching an ostrich hatch on a live feed. It's so addictive watching little Pip fight her way outta that shell!

I know I'm not the only one going gaga over a baby ostrich as all my friends and I are going back and forth like crazy on messenger while we watch it. I swear this will go down as one of those times we look back on in years to come and be like 'remember that night we all stayed up and watched an ostrich hatch online'.

Anyhoodle, if you'd like to check it out for yourself the link is below

Click here for ostrich cuteness

x Stacey

UPDATE:

Pip just hatched with a lot of help from her 'dad', they are now reporting her delivery to the world, while the internet watches Pip trying to stand up for the first time.


x Stacey

FINAL UPDATE:

Ok so Pip is doing fine and is now in her little warm home. Since it's now 12:07 am and I have uni in 8 hours I'm going to head off to sleep. I leave you with this final picture of Pip all happy in her home, I may turn on the live stream again in the morning and see if it's still going. 


Good night my lovelies,

x Stacey

Friday, 16 August 2013

Teacher Tuesday (on a Friday)

OK so I officially suck at sticking to something when I say I will. I have missed TWO Teacher Tuesdays, so to make up for one of them I come bearing another freebie as a peace offering.

Enter 2D Shape Art:


click image for link

2D Shape Art is a fun activity for students to consolidate and review their knowledge of 2D shapes, perfect to cap off an introductory lesson on shapes or as a follow up lesson. This activity allows students to unleash their creativity and use common 2D shapes to make a picture, what they create is only limited by their imagination.

The pack includes an introduction on how to use the sheets, a shape art worksheet for students to create their picture on, and two sheets of shapes. The shapes used in this activity include squares, rectangles, circles, ovals, triangles, hexagons, and rhombuses.

I created this pack for my prac students and they loved it, I ended up with pictures of everything from flowers to dinosaurs! If you do use this pack in your classroom I'd love to hear what your students create so please leave me a comment below :)

x Stacey